Refer to Show Descriptions for Cost Objects feature for more information on how to enable or disable this feature.
Hover a mouse pointer over the Allocations menu link to display its drop-down menu.
Slide a mouse pointer over to the Allocations to display its menu.
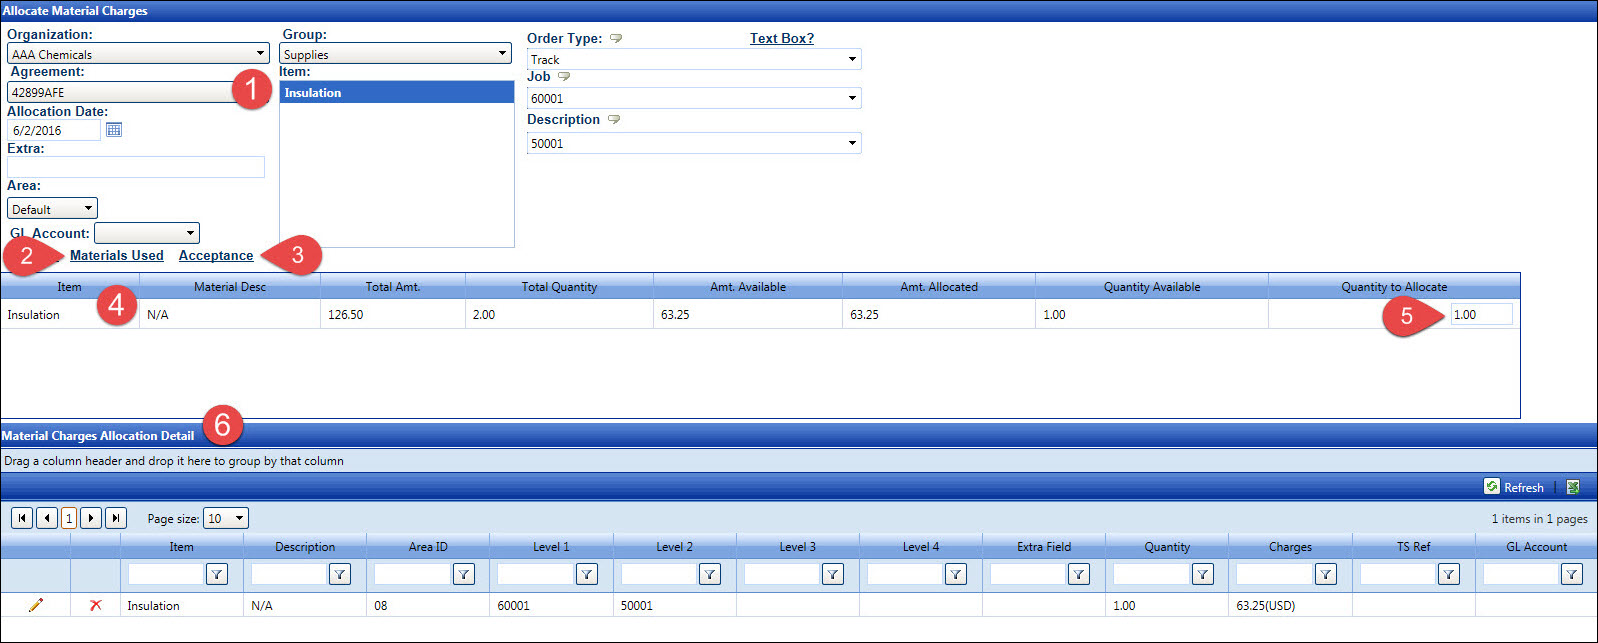
Click Material Charges to open the Allocate Material Charges screen.
Depending on the selected timesheet date, the material items with charges are displayed in the Item list box.
Clicking the Material Used button will open the Material Used screen. Refer to the Material Charges for more information.
Clicking the Acceptance button will open the Accept Material Charges screen. Refer to the Accept Material Charges for more information.
The available material item's detailed information is displayed in the grid.
Enter the number of the available material quantity in the Quantity to Allocate text box.
After the allocations is completed, the detail allocations appear in the Material Charges Allocation Detail grid.
If applicable, select a location from the Location drop-down list located at the menu bar.
From the Allocate Material Charges screen, select the organization from the Organization drop-down list.
Select an agreement from the Agreement drop-down list.
The All Group option in the Group drop-down list is selected by default. Select a specific material group from the Group drop-down list to display its material items in the Item list box.
Enter the timesheet date into the Allocation Date text box to display the material items with the available charges in the Item list box. Alternatively, select a date from the calendar. (see also Date Format)
Click a material item from the Item list box to highlight it and display its available charges information in the grid.
After selecting a material item with the available charges, the next process is to allocate these charges. The cost objects are displayed as text boxes by default. Before continuing with the allocations, click the Drop Down List? link to enable the cost objects as drop-down list. Otherwise, proceed with the allocations. The following instruction uses the text boxes for the cost objects.
From the Allocate Material Charges screen, select the order type from the Order Type drop-down list.
Enter the cost object information into the appropriate text boxes.
Enter additional information, up to 100 characters, into the Extra text box or leave the text box empty.
Select an area ID and GL account from the Area and GL Account drop-down lists, if applicable.
From the grid, enter the number of the available material quantity or the charges amount into the Quantity to Allocate text box.
Click the Allocate button to allocate and display the allocated material quantity and material charges in the Material Charges Allocation Detail grid.
If the Allow credits via the material module setting is enabled, it is only applied when entering the Receipt - Purchase for Jobs option from the Item Rate drop-down list.
The negative values indicate that the Allow credits via the material module setting is being used and will display on other screens throughout the daily process, such as Allocate Material Charges, Accept Material Charges, Authorization Central, Express Central, and Project Management.
Total spend on the Purchase Order (PO) does not accumulate above the total value of the PO from the ERP. Ensure that the authorization of credits and voids that would increase the available balance to be more than the original value of the PO from the ERP will not be allowed.
Timesheets will be grouped by allocations type (negative or positive) and sent to the SAP as separate timesheets.
If the material changes have been accepted or authorized, the Edit and Delete icons are disabled.
From the Charges Allocation Detail grid, click the Edit icon on a line item to enable the Area ID, Extra Field, and Quantity text boxes.
Make the changes then click the Update icon to save the modifications.
From the Charges Allocation Detail grid, click the Delete icon on a line item. The delete confirmation pop-up message appears.
Click OK to delete the allocated material charges and display the available material charges back into grid.
If the allocations are rejected, they are shaded and displayed in the Material Charges Allocation Detail grid. These allocations must be resolved, using one of the methods listed below. When the rejected allocations are resolved, then the letter R, representing Rejections, will no longer appear in the Accepted Material Costs Listing.
There are two methods to resolve the rejected material charges.
If the rejected allocations need changes to the number of the material charges, then follow the Edit Material Charges to allocate these material charges.
If the rejected allocations need changes to the work orders, then the allocations must be deleted and reallocated.
From the Material Charges Allocation Detail grid, click the Delete icon on a line item. The pop-up message appears.
Click OK to delete the selected allocation.
Follow the Allocate Material Charges instructions to allocate these material charges.