Hover a mouse pointer over the Activity menu link on the menu bar to display its drop-down menu.
Click Material Used to
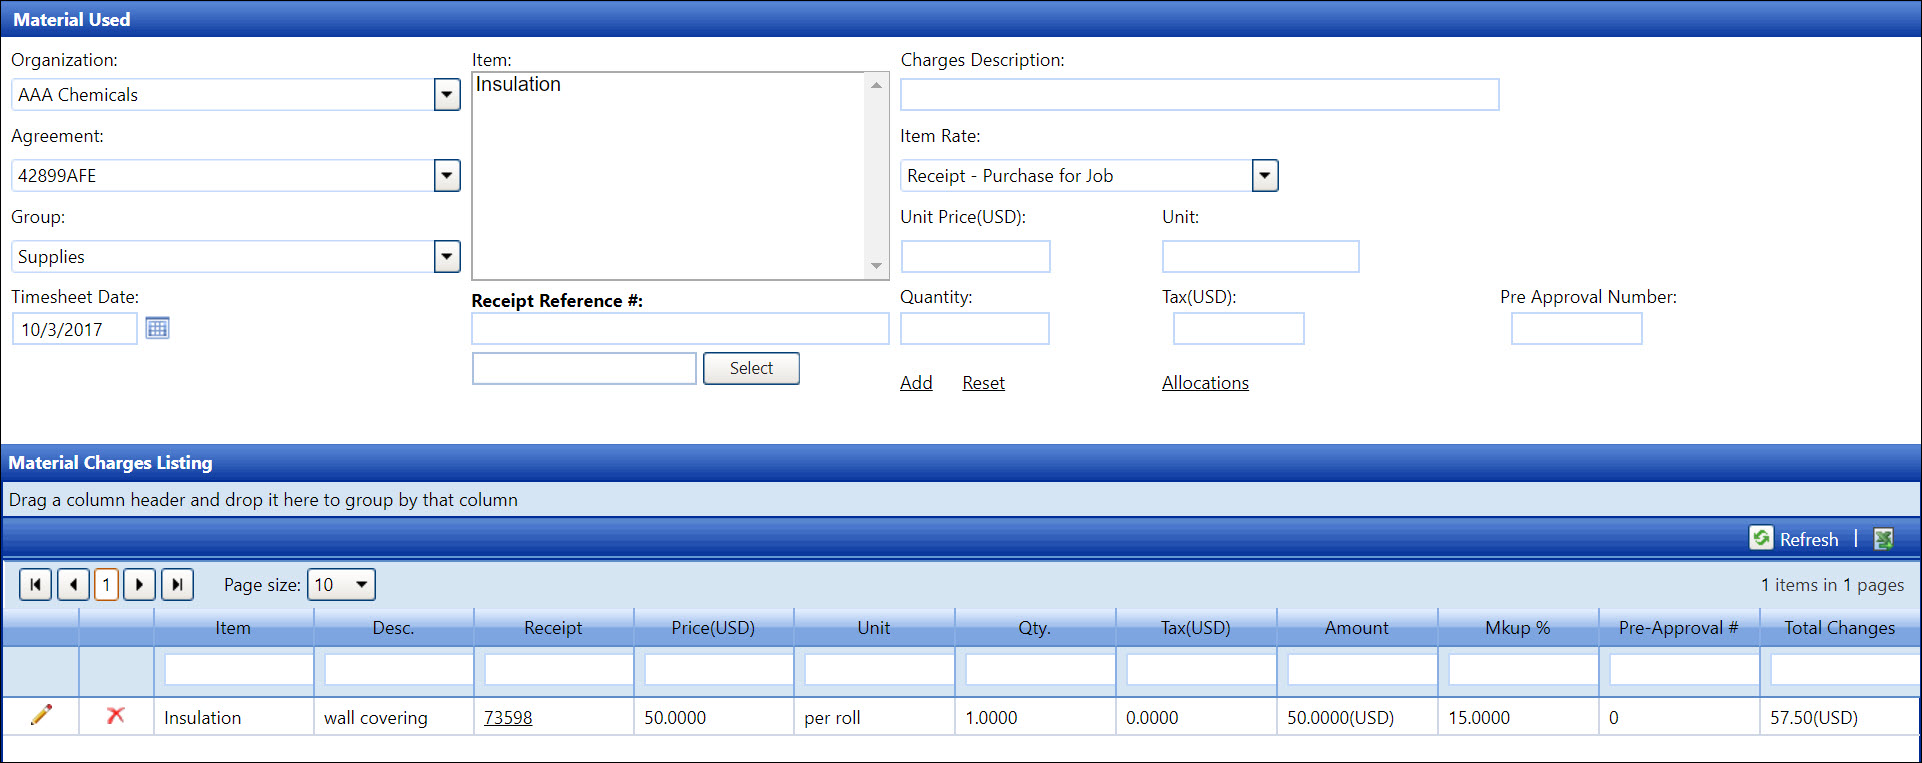
open the Material Used screen.
Materials are items that are not classified as a labor or an equipment which may include supplies such as a hammer, traveling expenses such as airplane ticket, or a per diem. Entering the material used depends on how it is set up in the material agreement. Material used may be entered as a receipt for items purchased, as unit of items per contract, or cost of items from contractor’s inventory.
After the material charges are added, click the Allocation link to open the Allocate Material Charges screen, displaying the selected material items in the Item list box. Refer to Allocate Material Charges for more information.
Hover a mouse pointer over the Activity menu link on the menu bar to display its drop-down menu.
Click Material Used to
open the Material Used screen.
If applicable, select a location from the Location drop-down list located at the menu bar.
From the Material Used screen, select an organization from the Organization drop-down list.
Select an agreement from the Agreement drop-down list.
Select a material group from the Group drop-down list to display the material items in the Item list box.
Select a material item from the Item list box to display the material charges in the Material Charges Listing.
All fields are required an entry. Enter N/A into the Charges Description text box if the charges description is undefined. Enter zero into the text box that required an amount entry, such the Tax text box. If the receipt is required for material allocation feature is enabled, the receipt must be attached when adding the material charges. Refer to Enable or disable the Receipt is required for material allocation feature for more information.
From the Material Used screen, select a material item from the Item list box to highlight it.
Enter the date into the Timesheet Date text box. Alternatively, select a date from the calendar. (see also Date Format)
The Charges Description text box is a mandatory field. Enter the material charges description into the Charges Description text box. If the material charges description is undefined, enter N/A for not applicable.
Select the item rate from the Item Rate drop-down list.
Receipt - Purchase for Jobs
Select the Receipt - Purchase for Jobs option from the Item Rate drop-down list.
Enter an amount for the selected item into the Unit Price text box.
Enter a unit, such as each, into the Unit text box.
Enter a quantity amount into the Quantity text box.
Tax amount is a required entry. Enter a tax amount into the Tax text box. Enter zero if the tax amount is undefined.
Receipt reference number is a required entry. Enter the receipt reference number into the Receipt Reference # text box. Enter a zero if a receipt reference number is undefined.
Track accepts an attached receipt in various file type, including a zip file. Click the Select button to upload the receipt reference file, if applicable. Once selected, the file name is displayed in the text box.
If the material used is associated with pre-approval request, enter the pre-approve request's approval numbers into the Pre-Approval Number text box.
Click Add to save and display the material charges in the Material Charges Listing. If receipt reference file was uploaded, click the receipt reference number to open the dialog box, displaying the receipt information. If there is no receipt reference file, clicking the receipt reference number will open the dialog box with the message, "Invoice does not exist."
Cost - From Inventory
Select the Cost - From Inventory option from the Item Rate drop-down list. The Tax and Receipt Reference # text boxes and the Select button disappear from the screen.
Enter a price of the selected item into the Unit Price text box.
Enter a unit, such as each, into the Unit text box.
Enter a quantity amount into the Quantity text box.
If the material used is associated with pre-approval request, enter the pre-approve request's approval numbers into the Pre-Approval Number text box.
Click Add to save and display the material charges in the Material Charges Listing.
If a material item has a pre-defined rate, defined by the contract, then it is only required to enter the charges description and the quantity amount.
From the Material Used screen, select a material item from the Item list box to highlight it and disable Unit Price and Unit text boxes. The Unit - Per Contract is displayed for the Item Rate. The unit price and the defined unit of the selected item appear as read-only in their text boxes. The Tax and Receipt Reference # text boxes, the Item Rate drop-down list, and the Select button disappear from the screen.
Enter the date into the Timesheet Date text box. Alternatively, select a date from the calendar. (see also Date Format)
Enter the material charges description into the Charges Description text box. If the material charges description is not defined, enter N/A, for not applicable.
Enter a quantity amount into the Quantity text box.
If the material used is associated with pre-approval request, enter the pre-approve request's approval numbers into the Pre-Approval Number text box.
Click Add to save and display the material charges in the Material Charges Listing.
If the Allow credits via the material module setting is enabled, it is only applied when entering the Receipt - Purchase for Jobs option from the Item Rate drop-down list.
From the Material Used screen, the users can enter a negative value into the Unit Price text box while leaving the positive value in the Quantity text box.
A receipt reference number is a required entry. Enter the receipt reference number into the Receipt Reference # text box. Then click the Select button to upload the receipt reference file.
When using the Allow credits via the material module setting, the Tax text box is disabled.
The negative values indicate that the Allow credits via the material module setting is being used and will display on other screens throughout the daily process, such as Allocate Material Charges, Accept Material Charges, Authorization Central, Express Central, and Project Management.
Total spend on the Purchase Order (PO) does not accumulate above the total value of the PO from the ERP. Ensure that the authorization of credits and voids that would increase the available balance to be more than the original value of the PO from the ERP will not be allowed.
Timesheets will be grouped by allocations type (negative or positive) and sent to the SAP as separate timesheets.
From the Material Charges Listing, click the Edit icon on a line item. The Desc., Receipt, Price, Unit, Qty., and/or Tax text boxes are enabled, depending on the selected material item defined rate.
Make the changes where applicable then click the Update icon to save the modifications.
From the Material Charges Listing, click the Delete icon on a line item. The delete confirmation pop-up message appears.
Click OK to delete the selected material charges.
Related Topics